Content
Learner topics
Use the Content tool to access course materials, complete required activities, and monitor your completion progress on topics contained within each course module.
What are the basics of Content?
- Accessing Content [1]
- Content user interface [2]
- Searching for a module or topic in Content [3]
- Viewing content [4]
- Enabling notifications in Content [5]
- Printing from Content [6]
- Submitting feedback in Content [7]
- Downloading content [8]
- Sending content to a mobile device via Desire2Learn Binder [9]
Instructor topics
Use the Content tool to post and organize course content so that information about course expectations, course syllabus, lecture notes, and important dates display to users clearly.
Course materials you post in Content can include documents, images, media files, CaptureCast presentations, URL links, and existing course activities. You can add release conditions, grade items, and learning objectives to topics to ensure users navigate through course materials while fulfilling specific course requirements and learning expectations.
You can also monitor class and user progress as students work through course content by setting automatic (determined by the system) or manual (determined by the student) completion tracking.
How do I create course content?
- Understanding the organization of Content [10]
- Creating modules and sub-modules in Content [11]
- Creating a new topic in Content [12]
- Adding and uploading course files as new Content topics [13]
- Creating and arranging your course content using drag and drop [14]
- Using HTML document templates in Content [15]
- Restricted file extensions [16]
How do I manage and update course content?
- Content display settings [17]
- Changing a module or topic status to Draft or Published in Content [18]
- Notifying students about updated course content [19]
- Editing a module or topic's title in Content [20]
- Bulk editing modules and topics in Content [21]
- Moving or reordering a module or topic in Content [22]
- Deleting modules or topics in Content [23]
- Adding or editing availability and due dates in Content [24]
- Adding or editing release conditions in Content [25]
- Adding a Learning Object to a module [26]
- Associating topics with learning objectives in Content [27]
- Adding an existing course object (activity) to Content [28]
How do I use SCORM in Content?
- Importing a SCORM package [29]
- Creating and editing a SCORM package [30]
- Removing simple sequencing from a SCORM package [31]
- Viewing SCORM reports on objects and users [32]
How do I track content completion and participation?
Audience:
- Learner [37]
Content basics
Audience:
- Learner [37]
Accessing Content
Access Content
Click ![]() Content on the navbar.
Content on the navbar.
Accessing content within the Content tool
If you work through course content online within the Content tool, you can access bookmarked content and follow course events from ![]() Bookmarks and
Bookmarks and ![]() Upcoming Events areas.
Upcoming Events areas.
The ![]() Table of Contents link enables you to browse course materials and assignments and keep track of your progress, since the number beside a module indicates how many topics within the module you need to complete. The number decreases as you work through course materials.
Table of Contents link enables you to browse course materials and assignments and keep track of your progress, since the number beside a module indicates how many topics within the module you need to complete. The number decreases as you work through course materials.
Use the Table of Contents panel to view a specific module or sub-module directly.
Audience:
- Learner [37]
Content user interface
The Content tool has four main areas:
-
 Overview An overview of the course and information about course expectations.
-
 Bookmarks Lists the topics you bookmark. Click the
  Add Bookmark icon while viewing a topic to add it to your bookmarks list. The number beside the Bookmarks link indicates how many bookmarks you added within the course.
-
 Upcoming Events Lists course material due dates, start dates, end dates, and other course events for the next seven days. Dates listed on this page are not exclusive to Content topics; upcoming events include all events within the course from the Calendar tool. The number beside the Upcoming Events link indicates how many upcoming events you have.
-
 Table of Contents Browse course materials and assignments here. The number beside a module listed in the Table of Contents panel indicates how many topics within the module you need to complete. The number decreases as you work through course materials.
Audience:
- Learner [37]
Searching for a module or topic in Content
You can search within a course's Content tool for modules and topics by title and description.
- Enter your search term in the Search Topics field.
-
Click
 Search. Search results display in the same sequence as they appear within course content.
- Click Clear Search to perform a new search.
Audience:
- Learner [37]
Viewing content
If you click on a .doc, .docx, .rtf, .rtfx, or .pdf file topic , you can preview it in a document viewer on the topic's page.
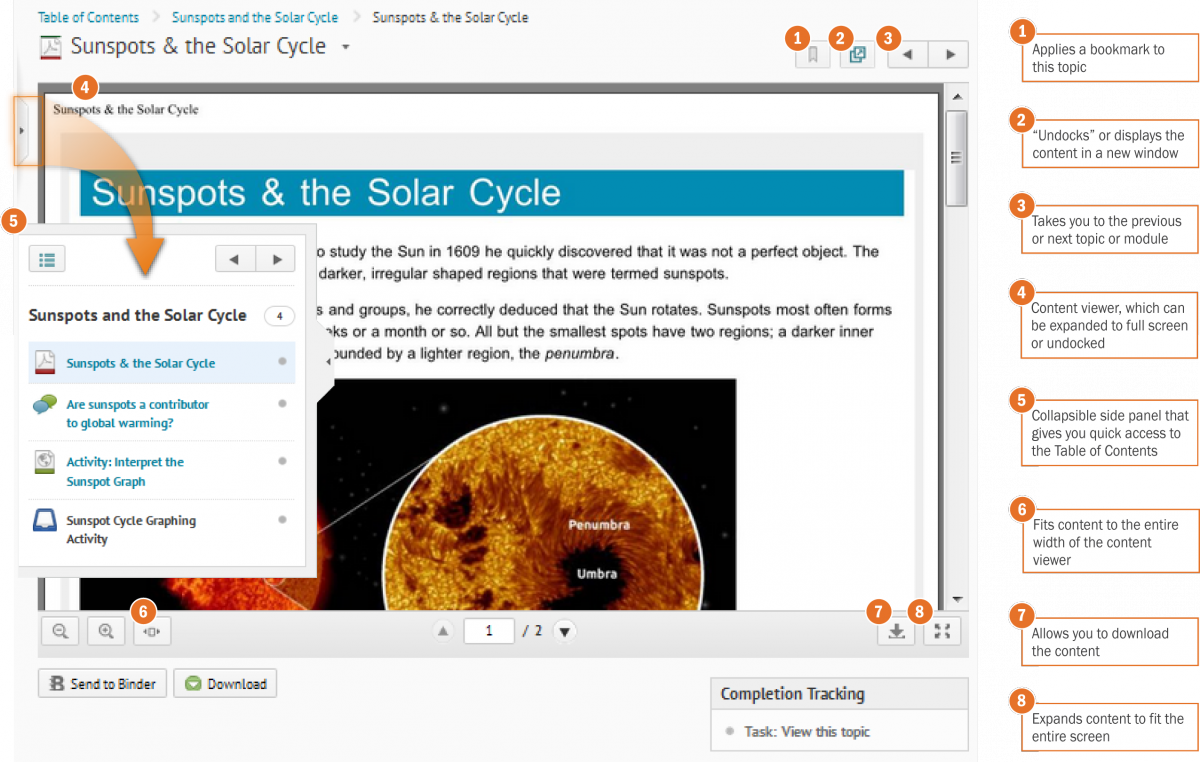
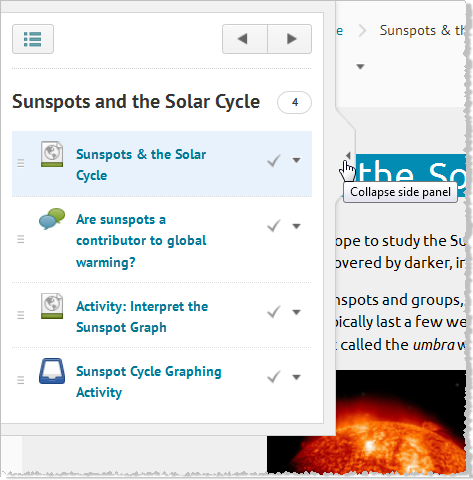
Collapsible side panel within topics
You can access content through a smaller version of the Table of Contents within a topic by opening the collapsible side panel, which only shows the contents of one module at a time. Click or swipe the side tab handle to open the side panel.
Note The swipe-to-open action for the collapsible side panel is not available on the Nexus 7 device.
Browse through modules by clicking the ![]() Previous module or
Previous module or ![]() Next module, or click the
Next module, or click the ![]() Go to Table of Contents icon to return to the Table of Contents page.
Go to Table of Contents icon to return to the Table of Contents page.
Click or swipe the tab handle to open the collapsible side panel within a topic
Audience:
- Learner [37]
Enabling notifications in Content
You can sign up to receive immediate text or email notifications when content items are updated. See Setting your notifications [38] for more information.
Enable notifications in Content
- Click Notifications from your personal menu on the minibar.
- Select if you want to receive Email, SMS, or, if available, Campus Life notifications for the option Content - content item updated.
See also
Audience:
- Learner [37]
Printing from Content
Print a course or module outline
-
On the Table of Contents or a module's page, click
 Print.
- Click Print.
Print a document topic
- Click on a document topic (for example, .doc, .docx, .rtf, HTML).
-
Click Print.
Audience:
- Learner [37]
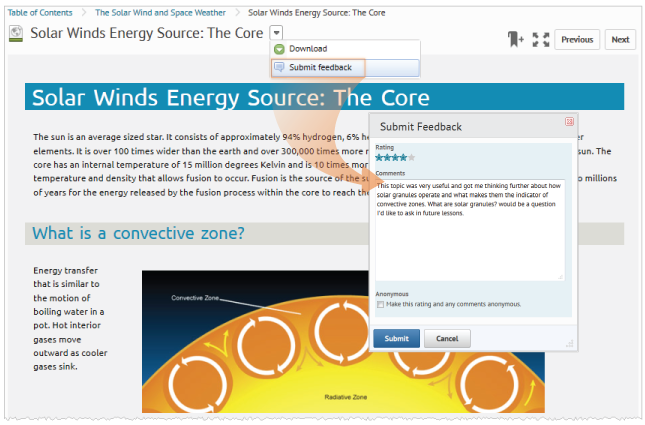
Submitting feedback in Content
Click on a topic, then click ![]() Submit Feedback from the topic's context menu to rate the quality of the content topic from 1 to 5 and leave a comment. You can choose to submit your feedback anonymously or include your name.
Submit Feedback from the topic's context menu to rate the quality of the content topic from 1 to 5 and leave a comment. You can choose to submit your feedback anonymously or include your name.
You can update your feedback submission by resubmitting feedback to the same topic, but only your newest comments and rating appear to instructors and course administrators. Resubmitted feedback overwrites previously submitted feedback regardless of whether you change your user status from anonymous to your user name (or from your user name to anonymous user).
Audience:
- Learner [37]
Downloading content
If you have the appropriate permissions, you can download individual topics or whole modules from the Content tool. You can also download all modules and topics in your course from the Table of Contents page in the Content tool. Downloading content to your computer is useful for viewing content offline. Your content downloads as zipped files and folders.
Download all content
-
On the Table of Contents page, click
 Download from the Table of Contents context menu.
- Choose a program to open your downloaded content with, or save the file to your computer.
Download a module
- Click on the module you want to download from the Table of Contents panel.
-
Click Download from the module's context menu.
- Choose a program to open your downloaded content with, or save the file to your computer.
Download a topic
-
Do one of the following:
- On the Table of Contents page, locate the topic you want to download.
- Click on the module that contains the topic you want from the Table of Contents panel.
-
Click Download from the topic's context menu.
- Choose a program to open your downloaded content with, or save the file to your computer.
Audience:
- Learner [37]
Sending content to a mobile device via Desire2Learn Binder
To send course content to your iPad, do one of the following:
-
Click
 Send to Binder from the context menu of the topic you want to send.
-
Click Send to Binder when viewing a topic.
Audience:
- Learner [37]
Creating course content
Audience:
- Instructor [39]
Understanding the organization of Content
Course Overview
When users access a course's Content tool for the first time, the first page they land on is the ![]() Overview. Use the Overview page to orient users to the course, content materials, and course expectations. You can insert course overview information using the HTML Editor beneath the Overview title, and you can add a file attachment by dragging a file from your computer onto the upload target, or by clicking
Overview. Use the Overview page to orient users to the course, content materials, and course expectations. You can insert course overview information using the HTML Editor beneath the Overview title, and you can add a file attachment by dragging a file from your computer onto the upload target, or by clicking ![]() Add an attachment from the Overview context menu.
Add an attachment from the Overview context menu.
Note If you decide not to add anything to the Overview, the ![]() Overview link and page is hidden from student view.
Overview link and page is hidden from student view.
See Adding and uploading course files as new Content topics [13] for compatible file types available when adding to Overview.
Bookmarks
Topics you bookmark appear in a list on the Bookmarks page. Click the ![]() Add Bookmark icon while viewing a topic to add it to your bookmarks list. The number beside the
Add Bookmark icon while viewing a topic to add it to your bookmarks list. The number beside the ![]() Bookmarks link indicates how many bookmarks you have.
Bookmarks link indicates how many bookmarks you have.
Upcoming Events
The Upcoming Events page lists course material due dates, start dates, end dates, and other course events for the next seven days. If you set availability dates or a due date for a course object, it appears in the Upcoming Events page and the Agenda view in the Calendar tool.
The dates listed on this page are not exclusive to Content topics; upcoming events include all events within the course from the Calendar tool. Click Course Schedule to view all past, current, and future course events. The number beside the ![]() Upcoming Events link indicates how many upcoming events you have.
Upcoming Events link indicates how many upcoming events you have.
Table of Contents
The Table of Contents panel lists all modules available in your course. Click on a listed module to view and manage its details, topics, and sub-modules. You can also stay on the Table of Contents page to view and manage all modules and topics. Click on the ![]() Table of Contents link to access the Table of Contents page. This page enables you to view and manage all modules and topics. You can add new topics to existing modules by dragging and dropping files from your computer onto upload targets on the Table of Contents page, and you can also rearrange course materials by dragging and dropping topics between modules. See Creating and arranging your course content using drag and drop [14] for more information.
Table of Contents link to access the Table of Contents page. This page enables you to view and manage all modules and topics. You can add new topics to existing modules by dragging and dropping files from your computer onto upload targets on the Table of Contents page, and you can also rearrange course materials by dragging and dropping topics between modules. See Creating and arranging your course content using drag and drop [14] for more information.
The number beside each module name in the Table of Contents panel listing indicates the number of topics you have set completion tracking [33] for. The number beside the Table of Contents link indicates the total number of topics you have set completion tracking for. Use the number totals to determine the task load being put on students per module.
See also
Audience:
- Instructor [39]
Creating modules and sub-modules in Content
You must create a module before you can add topics. You can create sub-modules (modules within existing modules) to establish a deeper hierarchy.
If you want to keep your course content hidden while you are building it, set the status of your modules and/or topics as Draft.
Note If your course is SCORM 2004-compliant, any new modules you create are outside the sequencing and navigation built into the SCORM package.
Create a new module
-
Click the Table of Contents link in the Table of Contents panel.
- On the Table of Contents page, enter your new module title in the Add a module... field, which is below the Table of Contents title and any existing modules.
- Press Enter or click outside the field to add the module.
Create a new sub-module
- Click on the module you want to add a sub-module to from the Table of Contents panel.
- Enter your new sub-module title in the Add a sub-module... field.
- Press Enter or click outside the field to add the sub-module.
Audience:
- Instructor [39]
Creating a new topic in Content
- Click on the module you want to create a new topic for from the Table of Contents panel.
-
Select one of the following options from the New button:
-
 Upload Files
-
 Create a File
-
 Create a Link
-
 Add from Manage Files
-
 Add Object from LOR
-
 New Checklist
-
 New Discussion
-
 New Dropbox
-
 New Quiz
-
 New Survey
-
-
Fill in the required fields, such as topic Title, a URL link, Instructions, or select the appropriate files you want to add or upload.
Tip If you create a
Create a File, you can choose to  Browse for a Template. This enables you to work from an existing template and ensure consistency across topics. See Using HTML document templates in Content [15] for more information.
-
Do one of the following:
- If you are creating a new document, link, dropbox folder, discussion, or quiz, click Publish.
- If you are adding files from My Computer, Course Offering Files, or Shared Files, click Add.
-
You can continue to edit the new topic's additional details by:
- Setting a completion tracking method. See Using completion tracking in Content [33] for more information.
- Adding a topic description.
- Attaching supplementary files.
- Modifying submission options (e.g. number of attempts, number of submissions). See Managing dropbox folder submission handling [40] for more information.
- Changing topic status (e.g. from Draft to Published).
- Adding restrictions (e.g. availability dates, due date, release conditions). See Release Conditions [41] for more information.
- Adding a grade item. See Creating grade items [42] for more information.
- Adding learning objectives. See Adding Learning Objects to Content [26] for more information.
See also
Audience:
- Instructor [39]
Adding and uploading course files as new Content topics
Browse your Manage Files area to create topics from existing files. You can use the following types of files as topics:
| Extension | File Type |
|---|---|
| HTM, HTML, MHT, MHTML | Web Document |
| RTF, PPT, PPS, PDF, DOC, DOCX, PPTX, XML, XLS, TXT, WPD | Text Document |
| JPG, JPEG, PNG, GIF, BMP, TIF, TIFF | Image |
| SWF, MPG, MPEG, RM, MP3, MP4*, M4V*, M4A*, AVI, WAV, RAM, ASF, MOV, RA | Media |
You can also upload all of these file formats from your desktop directly into the Content tool.
- For web documents, Learning Environment strips the < title > tag and text within that tag from user created web documents.
- You can use WMA and WMV files for topics, but they're not recommended, as users who access them through Firefox require a plug-in for them, and the plug-in does not guarantee the file plays for them. You can download the plug-in here: http://www.interoperabilitybridges.com/windows-media-player-firefox-plugin-download [43]
- *The extensions MP4, M4V, and M4A are new. These extensions allow users to drag entire albums, Video Podcasts, and movies from iTunes.
Audience:
- Instructor [39]
Creating and arranging your course content using drag and drop
In the Content tool, drop and upload targets indicate where you can drag a particular file, module, or topic.
Table of contents
- Drag and drop files from your computer to create and update topics
- Move and reorder modules and topics
- Update existing files
Drag and drop files from your computer to create and update topics
If you drag a file over an upload target, that area appears green or orange to indicate you can drop it there. Upload targets contain the text "Drag and drop files here to create and update topics." Drag files from your computer into a module's upload target to add or update topics (the files will save in the Manage Files tool).
You can also drop files from your computer directly into modules in the Table of Contents panel and into a topic's collapsible side panel.
Note Internet Explorer 9 and older currently do not support dragging and dropping files from your desktop into Learning Environment.

Upload targets appear green to indicate a file can be added into a module
Drop targets appear orange to indicate a file can be added into the Table of Contents
Within a topic, you can use the collapsible side panel to add and restructure your content
Note The collapsible side panel is a compact version of the Table of Contents. It only lists the topics within a single module.
Move and reorder modules and topics
Dragging to drop targets is a quick way of reorganizing modules and topics. If you drag a module or topic above or below other modules and topics, a gray line appears to indicate you can drop the module or topic there. If you drag a module or topic over another module, the module appears orange to indicate you can drop it there.
If you do not remember where you recently moved a module or topic, use the Content tool's Search field to find them.
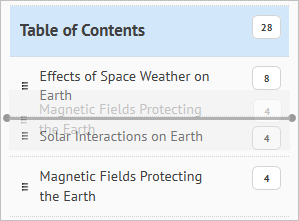
When you drag a module, a gray line indicates a drop target
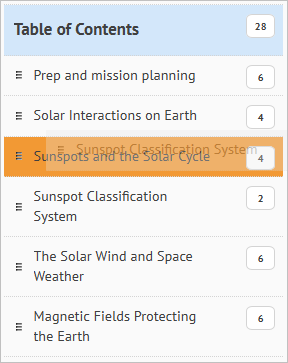
A module turns orange when it is a drop target for another module or topic
Update existing files
You can automatically update your existing files by dragging the newest version of your file from your computer into the appropriate module.
Audience:
- Instructor [39]
Using HTML document templates in Content
You can create a new HTML document based on any existing HTML file. If you set up a path to a directory containing HTML templates in Manage Files, these template choices appear in a drop-down list when you create a new document. All links to assets such as images, CSS, and JS files are maintained when you create a new HTML document from a template in Content.
Therefore, you can build many documents from one central template housed in the template directory, with standard styles and images already included.
If you have already created an entirely new HTML document, you can save it in your template directory for other documents.
Enable HTML templates
-
Click
 Settings in the Content tool.
- Select the Enable HTML Templates check box.
- Click Change Path.
-
Select the folder that will contain your template directory, or create a
 New Folder for it.
-
If you want to house your templates in a shared folder, click
 Shared Files first, then click New Folder.
Tip Normally, a course has its own template directory in Course Offering Files. However, if you want the template directory to be available for all courses and you have the necessary access permissions, set the template directory to a folder in Shared Files. It will be available to all courses within the organization.
-
If you want to house your templates in a shared folder, click
- Click Select Path.
- Click Save.
Apply an HTML template to a new document
-
In a module, click Create a File from the New button.
-
One of two options will be available:
- Select a Document Template from the drop-down listif you have a defined template directory.
-
Click Browse for a Template if you do not have a defined template directory. You can search for templates located in other folders or on your computer.
-
Once you have selected a template, customize it according to your needs and click Publish or Save as Draft.
Note If you decide to save a draft based on an HTML template to a different file path, all links to images, css, or js assets are retained.
See also
- HTML Editor [44]
Audience:
- Instructor [39]
Restricted file extensions
The following file extensions are not supported by Learning Environment:
| Restricted Upload Extensions | |||
|---|---|---|---|
| ASP | ASHX | JSL | VB |
| ASPX | ASMX | LICX | VBPROJ |
| EXE | AXD | REM | VJSPROJ |
| BAT | CDX | RESOURCES | VSDISCO |
| DLL | CER | RESX | WEBINFO |
| COM | CONFIG | SHTM | INI |
| ASA | IDC | SHTML | |
| ASAX | CS | SOAP | |
| ASCX | CSPROJ | STM | |
-
For web documents, Learning Environment strips the
< title >tag and text within that tag from user created web documents. - If your course is SCORM 2004-compliant then any new topics you create are outside the sequencing and navigation built into the SCORM package.
Audience:
- Instructor [39]
Managing and updating course content
Audience:
- Instructor [39]
Content display settings
You can change how course content appears in the Content tool by selecting your viewing preferences in the Content Settings area.
Manage Content settings
Click ![]() Settings in the Content tool. From here, you can do the following:
Settings in the Content tool. From here, you can do the following:
- Set how content is arranged in the module view by selecting from the Content Arrangement drop-down list. See Arranging content by "Content Type" for more information.
- Show or hide the collapsible content browser and navigation buttons in the content viewer by checking or clearing the Show navigation in the Content Viewer check box.
- Select Enable HTML Templates to make them available when creating content. See Using HTML document templates in Content [15] for more information.
- Set your default font settings from the Default Font Settings drop-down list.
- Select the Automatically update files with the same file name check box from the Drag and Drop Upload section if you want to automatically overwrite a module's existing content each time you drag and drop files of the same name and file type into the same module.
- Set the default completion tracking method from the Default Completion Status drop-down list.
Once you finish customizing your Content settings, click Save.
Arranging content by "Content Type"
If you select to arrange course content by Content Type from the Content Arrangement drop-down list, each module will appear in the following content type groups:
- Materials (Uploaded files, course files, new documents, and links.)
- Modules (Sub-modules. Topics within sub-modules only appear arranged by Content Type once you navigate into the sub-module.)
- General (External Learning Tools.)
- Dropbox
- Quizzes
- Discussions
- Checklists
- Chats
- Self Assessments
- Surveys
See also
Audience:
- Instructor [39]
Changing a module or topic status to Draft or Published in Content
If you set a module's status as Draft, the module and all its topics are hidden from students.
-
Do one of the following:
- To change a module's status, click the module name from the Table of Contents panel.
- To change a topic's status, locate the topic on the Table of Contents page, or click on its module from the Table of Contents panel.
-
Click on
 Draft or
  Published to change the status.
Tip As you build your course content, set your modules as drafts to keep them hidden from your students until they are complete and ready for viewing.
Audience:
- Instructor [39]
Notifying students about updated course content
You can notify students when updating or changing a topic in Content. They receive an Update alert notification in their minibar; clicking the alert brings them to the updated topic.
Notify students about updated course content
- Locate the topic on the Table of Contents page, or click on its module from the Table of Contents panel.
- Click on the topic you want to update.
-
Click
 Edit HTML or Change File from the topic's context menu.
- Make your changes, then select the Notify students that the content has changed check box.
- You can Add a summary of the changes to indicate to students what has changed since the update.
- Select the Reset completion tracking check box if you want to ensure students revisit the topic to complete the activity.
- Click Update.
Audience:
- Instructor [39]
Editing a module or topic's title in Content
Edit a module's title
- Click the module from the Table of Contents panel.
- Click on the module title and make your changes.
- Press Enter on your keyboard or click outside the title field to save your changes.
Edit a topic's title
- Locate the topic on the Table of Contents page, or click on its module from the Table of Contents panel.
-
Click Edit Properties In-place from the topic's context menu to make the title editable.
- Click on the topic title and make your changes.
- Press Enter on your keyboard or click outside the title field to save your changes.
Audience:
- Instructor [39]
Bulk editing modules and topics in Content
-
On the Table of Contents page, click
 Bulk Edit.
-
Make your changes to titles, descriptions, and restrictions. You can also delete multiple topics in Bulk Edit mode by clicking the
 Remove Topic icon beside each topic title you want to delete.
- Click Update where appropriate.
- Click Done Editing when finished.
Note Except for date restriction changes, most changes save automatically.
Audience:
- Instructor [39]
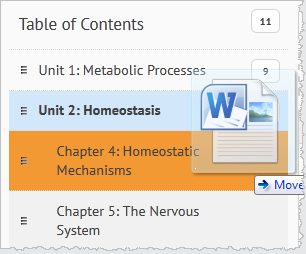
Moving or reordering a module or topic in Content
-
Do one of the following:
- Click on the module you want to move or reorder from the Table of Contents.
- On the Table of Contents page, locate the topic you want to move or reorder.
-
Click
 Move Up or
  Move Down from the module or topic's context menu to reorder it.
-
Click
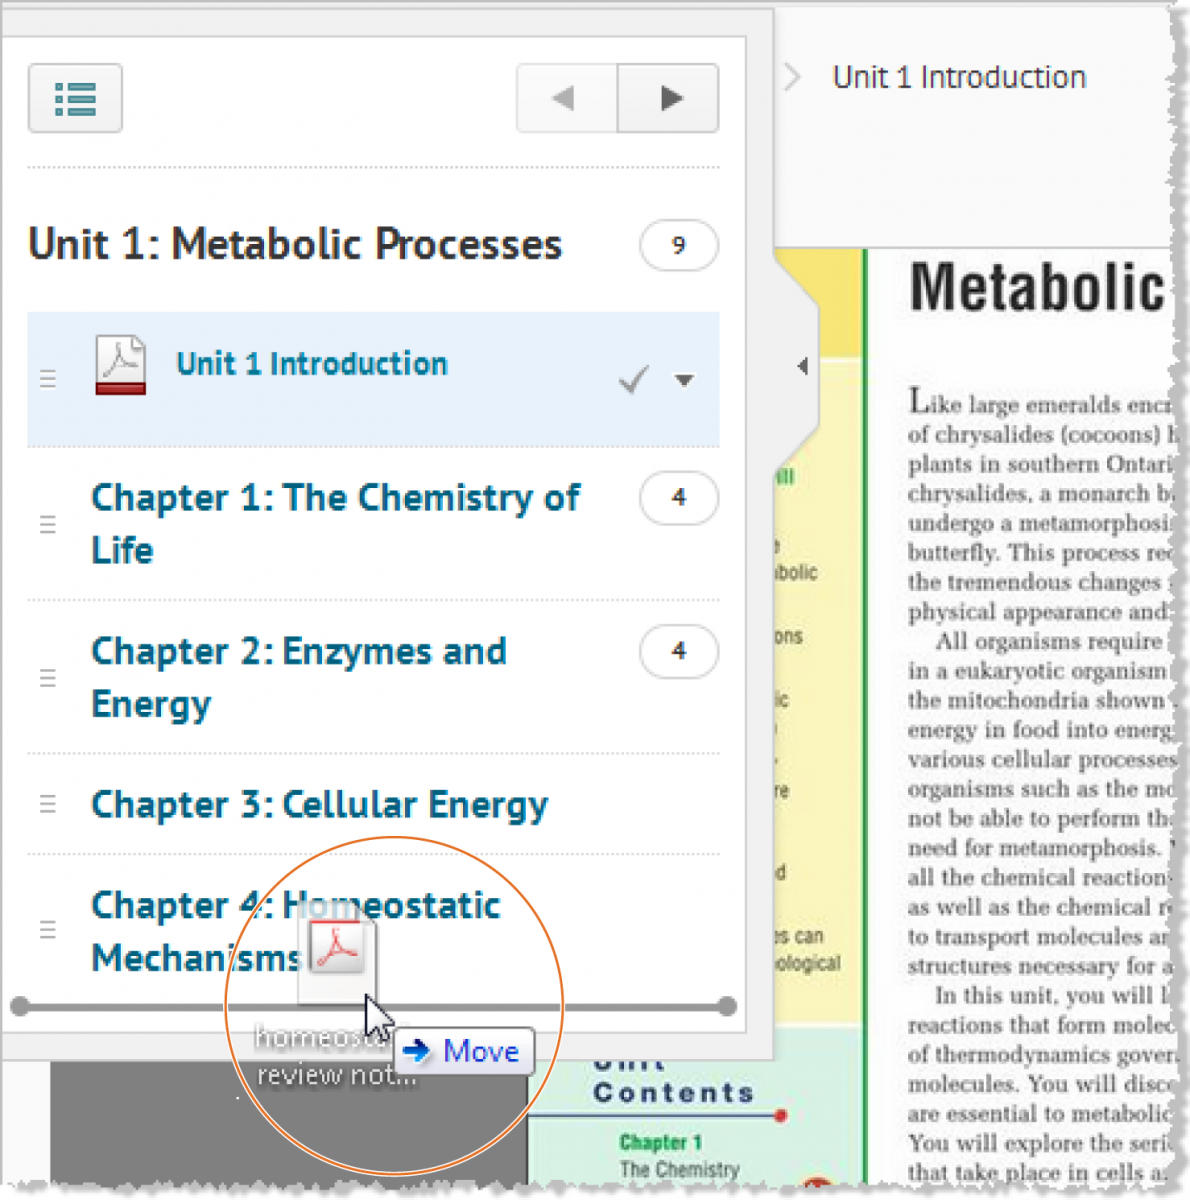
 Move To from the module or topic's context menu to move it to a different module within the course. Select the new module and click Move.
Audience:
- Instructor [39]
Deleting modules or topics in Content
Note Deleting a module deletes all topics within that module.
Delete a module or topic
-
Do one of the following:
- Click on the module you want to delete from the Table of Contents.
- On the Table of Contents page, locate the topic you want to delete.
-
If you are deleting a module, click Delete Module from the module's context menu. If you are deleting a topic, click Delete Topic from the topic's context menu.
- Decide whether you want to remove the module or topic from the Content view only or permanently delete the module or topic from the course (this will also delete all associated objects including discussions, quizzes, etc).
- Click Delete.
Delete all modules
-
On the Table of Contents page, click Delete All Modules from Table of Contents' context menu.
- Decide whether you want to remove the modules from the Content view only or permanently delete them from the course (this will also delete all associated objects including discussions, quizzes, etc).
- Click Delete.
Audience:
- Instructor [39]
Adding or editing availability and due dates in Content
Start and end dates specify when students can access a module.
Add or edit availability and due dates for a module
- Click the module name from the Table of Contents panel.
- Click Add dates and restrictions... or directly on the module's existing dates and/or release conditions.
-
Do any of the following:
- To add dates for the module, click Add due date..., Add start date..., and/or Add end date....
- To edit dates for the module, click directly on the existing date and/or time fields.
-
To delete a date for the module, click a date's
 Remove date icon.
- Click Update.
Note If you set availability dates or a due date for a module, the module appears on the Upcoming Events page and the Agenda view in the Calendar tool.
Add or edit availability and due dates for a topic
- Locate the topic on the Table of Contents page, or click on its module from the Table of Contents panel.
-
Do one of the following:
-
Click Edit Properties In-place from the topic's context menu.
- Click directly on the topic name.
-
Click
- Click Add dates and restrictions... or directly on the topic's existing dates and/or release conditions.
-
Do any of the following:
- To add dates for the module, click Add due date..., Add start date..., and/or Add end date....
- To edit dates for the module, click directly on the existing date and/or time fields.
-
To delete a date for the module, click a date's Remove date icon.
- Click Update.
Audience:
- Instructor [39]
Adding or editing release conditions in Content
Add or edit release conditions for a module
- Click the module name from the Table of Contents panel.
- Click Add dates and restrictions... or directly on the module's existing dates and/or restrictions.
-
Do one of the following:
- To create new release conditions, click Create, then select the Condition Type and complete the Condition Details. Click Create.
- To reuse existing release conditions, click Browse, then select a condition. To narrow the list of conditions, choose the tool the condition is based on from the View Conditions for drop-down list. Click Attach.
- Choose whether access to the module is dependent on meeting all or any of your conditions.
- Click Update.
Add or edit release conditions for a topic
- Locate the topic on the Table of Contents page, or click on its module from the Table of Contents panel.
-
Do one of the following:
-
Click Edit Properties In-place from the topic's context menu.
- Click directly on the topic name.
-
Click
- Click Add dates and restrictions... or directly on the topic's existing dates and/or release conditions.
-
Do one of the following:
- To create new release conditions, click Create, then select the Condition Type and complete the Condition Details. Click Create.
- To reuse existing release conditions, click Browse, then select a condition. To narrow the list of conditions, choose the tool the condition is based on from the View Conditions for drop-down list. Click Attach.
- Choose whether access to the topic is dependent on meeting all or any of your conditions.
- Click Update.
Audience:
- Instructor [39]
Adding a Learning Object to a module
-
On the Table of Contents page, click Add Object from LOR from the context menu of the module you want to add a Learning Object to.
- Click Search to browse for the learning object you want to add, or browse by category.
- Select a learning object and click Next.
- On the Retrieve Object page, select whether you want to create a dynamic or locked link to the learning object in Content, or whether you want to create a copy of it, and click Next.
- If you create a dynamic link or locked link, you can select the Preview/view the content topic in a new window or tab check box. If you are copying the object as content and the destination folder listed is not the one you want, click Choose Destination to select a new folder.
- Click Create Topic or Copy.
Audience:
- Instructor [39]
Associating topics with learning objectives in Content
You can associate topics with learning objectives directly from the Content tool, but you must have existing learning objectives in the Competencies tool before you can create these associations.
Associate a topic with a learning objective
-
Do one of the following:
- On the Table of Contents page, locate the topic you want to associate with a learning objective.
- Click the module from the Table of Contents panel that contains the topic you want to associate with a learning objective.
- Click on the topic.
- Click Add Learning Objective.
- Browse or search for learning objectives you want to add. You can click a learning objective to view its information.
- Select the check box beside each learning objective you want to add.
- Click Add Selected.
See also
- Competencies [45]
Audience:
- Instructor [39]
Adding an existing course object (activity) to Content
- Click on the module you want to add a course object to from the Table of Contents.
-
Select one of the following from the Add Existing Activities button:
-
 Chat
Chat
-
Checklist
-
Discussions
-
Dropbox
-
 ePortfolio item
-
 External Learning Tools
-
 Forms
Forms
-
 LiveRoom
-
 Online Rooms (only available at the Organization level)
-
Quizzes
-
 Self Assessments
-
Surveys
-
- Click on the existing activity you want to insert from the drop-down list, or if you create a new activity, click Create and Insert.
Audience:
- Instructor [39]
Using SCORM in Content
Audience:
- Instructor [39]
Importing a SCORM package
If you use SCORM for your course, you must import an existing package as a zip file to Learning Environment. The SCORM package includes all the Sharable Content Objects (SCOs) and associated Sharable Content Assets (SCAs). Sequencing and navigation are also part of the package. See Importing course components from a file [46] for detailed information about importing content.
- If your package is SCORM-2004 compliant you must select the Select all Components check box on the Select Course Material page for the sequencing and navigation to function properly.
-
As of Learning Environment 10.1, the Content tool no longer indicates SCORM objects with a
 SCORM icon, but you can view a list of SCORM objects from the SCORM Reports page.
See also
Audience:
- Instructor [39]
Creating and editing a SCORM package
You can edit SCORM packages with the same options that are available when you create content topics. Although you can add a grade item to a SCORM object, completing a quiz included in a SCORM package automatically generates a grade item in the grades list, populated with the quiz results.
Create or edit a SCORM object's grade item
-
Do one of the following:
- On the Table of Contents page, locate the topic you want to edit.
- Click on the module that contains the topic you want to edit from the Table of Contents panel.
- Click on the topic.
- Click the Add a Grade Item area.
-
Do one of the following:
- Select an existing grade item from the drop-down list.
-
Click the
 New Grade Item icon to create a new grade item. Fill in the form and click Create.
- Select the Allow auto export to Grades check box if you want to automatically export grades to the Grades tool.
- Click Save.
Audience:
- Instructor [39]
Removing simple sequencing from a SCORM package
You can remove the sequencing and navigation rules from a SCORM package if you want to use some of the modules or topics in another course, or reorder modules and topics in the current course.
Removing sequencing and navigation from a SCORM package resets progress tracking for those topics.
Remove simple sequencing
- Click on the module you want to remove simple sequencing for from the Table of Contents.
-
Click
 Remove Sequencing from the module title's context menu.
- Click Yes to confirm action.
Audience:
- Instructor [39]
Viewing SCORM reports on objects and users
If your course is based on SCORM, or uses SCOs as part of the course content, you have access to additional activity reports for each SCORM object and user. The reports track the activity on a topic and individuals’ progress with meeting defined objectives, and in defined interactions with the course content.
Note The data in these reports depends on the data communicated to Learning Environment by your SCOs. For example, if the SCO does not set values for objectives, then no objective information is available in the SCORM reports for that SCO.
You can export SCORM statistics; however, unlike non-SCORM courses, you cannot reset the statistics.
Viewing reports on SCORM objects
For each SCORM object, Learning Environment records:
- The number of user attempts on the object.
- The number of attempts completed (Some attempts appear as incomplete if a user ends the attempt at an object).
- The number of attempts passed, the passing score, and the average score.
- Average time spent on the object.
You can also view details on user attempts, objectives, and interactions for each item.
View reports on SCORM objects
-
On the Table of Contents page, click
 View Reports from the Related Tools button.
-
Click
 SCORM Reports.
View detailed reports on SCORM objects
-
On the Table of Contents page, click View Reports from the Related Tools button.
-
Click SCORM Reports.
-
On the SCORM Objects tab, click one of the following icons beside the SCORM object you want to view:
-
Summary icon for information on users progress and whether their progress is complete or incomplete, their status, their score, number of attempts, time spent, average time spent, and when they last accessed it.
-
 Objective Details icon for information on users progress with the course objectives including their score, status, progress, and progress measure.
-
 Interaction Details icon for information on users attempts at the interactions in an objective including question type, correct response, learner response, result, weighting, and time spent.
-
- You can click the Show Additional Details link to view a summary of results.
-
Click
 Go Back to return to the main SCORM Reports page.
Viewing reports on users of SCORM objects
For each user of SCORM content, Learning Environment records:
- The user’s name and ID numbers.
- The number of SCORM objects attempted.
You can also access details on a user's progress, status, scores, attempts, time spent, date last accessed, objective details, and interaction details.
View reports on users of SCORM objects
-
On the Table of Contents page, click View Reports from the Related Tools button.
-
Click SCORM Reports.
- Click the Users tab.
View a detailed SCORM report on an individual user
-
On the Table of Contents page, click View Reports from the Related Tools button.
-
Click SCORM Reports.
- Click the Users tab.
- Click on a user's name to view SCORM details.
-
Click Go Back to return to the Users tab on the main SCORM Reports page.
Audience:
- Instructor [39]
Tracking content completion and participation
Audience:
- Instructor [39]
Using completion tracking in Content
Completion tracking enables instructors to set the method of completion for an activity and provides progress indicators for students as they complete course activities.
- Automatic Completion Completion tracking that automatically determines whether users have completed a topic when they click to view it. For some activities, automatic tracking requires users to participate in a chat or discussion, submit a file or form, or complete an assessment such as a quiz or survey before completion is successful.
- Manual Completion Completion tracking that is manually set by users. Users can select the completion check box beside each content topic to indicate they have completed it. Although users can use manual tracking to indicate that they have accomplished a task before it is completed (e.g. selecting the completion check box beside a quiz activity before attempting the quiz at all), this does not affect assessment scores or user attempts counted towards an activity.
Note Changing an automatically tracked topic to manual completion resets completion tracking for that topic. This means that users might have to return to the topic to mark it complete; users do not need to resubmit files or assessment activities.
- Modify the completion tracking method for a topic
- Modify the completion tracking method for a module
- Set the default completion status for Content
- View completion tracking results for a topic
- Access a user's submission from Content
Modify the completion tracking method for a topic
-
Do one of the following:
- In the Table of Contents panel, click the module that contains the topic you want to modify.
-
Click the Table of Contents link to see all modules and their topics on one page.
-
Click Bulk Edit to modify multiple modules at once, or click Edit Properties In-place from the context menu of a topic.
-
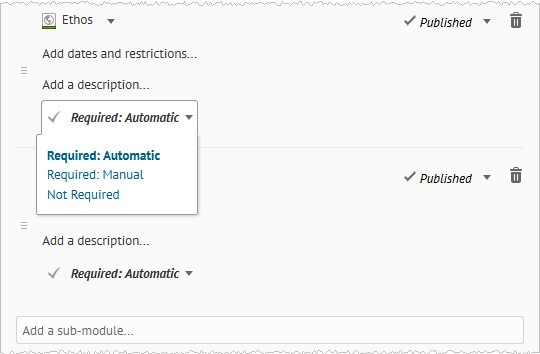
Select one of the following options from the topic's completion tracking drop-down list:
- Required: Automatic
- Required: Manual
- Not Required
Modify the completion tracking method for a module
- Click the module you want to modify from the Table of Contents panel.
-
Click
 Set All Completion from module's context menu.
- Choose a completion tracking method and click Update to update all topics in a module.
Set the default completion status for Content
-
Click Settings in the Content tool.
-
Select one of the following from the Default Completion Status drop-down list:
- Required: Automatic
- Required: Manual
- Not Required
- Select Update all existing topics to use selected completion status to apply the default completion status to existing topics.
- Click Save.
View completion tracking results for a topic
- Click the topic you want to view completion tracking results for.
- On the topic page, expand the Completion Summary (located below the topic).
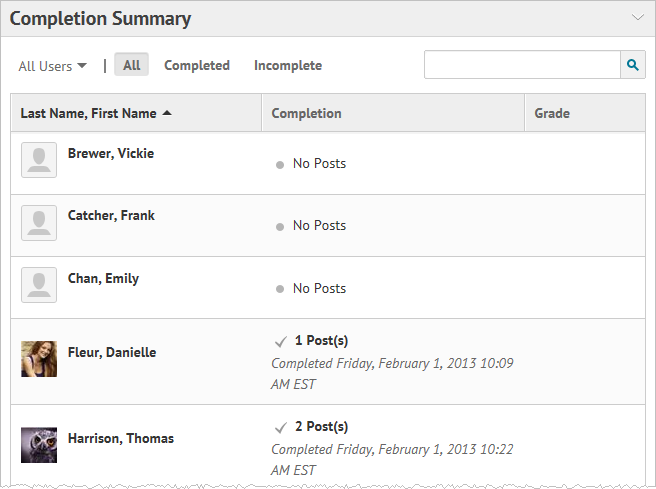
The Completion Summary shows each user's progress for the topic in a table format. The Completion Summary is located within a topic, below its content.
Each topic contains a Completion Summary with student completion tracking results that you can view directly in the Content interface.
The types of completion results depend on what the topic is: for example, completion tracking results for a dropbox folder indicate whether a student has submitted anything, while results for a file topic indicate whether a student has viewed the topic or not.
In addition to the existing "Completed" and "Incomplete" filters, you can also filter users in the Completion Summary by the groups or sections you created within your course. For information about creating a group or section within your course, see Creating a group [47] or Creating sections [48].
Access a user's submission from Content
In the topic's Completion Summary, click the user's name. You can access the results of a user's Quiz, Survey, or Dropbox submission directly from Content.
Note This option is only available if the user has made a submission to this topic.
See also
- Creating a group [47]
- Creating sections [48]
Audience:
- Instructor [39]
Course content statistics
Course statistics can display the total number of users, the number of users who visited course content, and the average time users spent viewing content. You can view overall course content statistics, and specific statistics for individual topics.
- A user who visits multiple times is only counted once.
- The total number of users counted in statistics does not include users who have permission to Manage Content.
- Calculated time users spent viewing overall content or individual topics does not include user session timeouts and users currently visiting content and topics as you view statistic details.
View overall content statistics
-
On the Table of Contents page, click View Reports from the Related Tools drop-down list.
-
Click
 Statistics.
View specific topic statistics
-
On the Table of Contents page, click View Reports from the Related Tools drop-down list.
-
Click Statistics.
- Click the number in the Users Visited column beside a topic to view all statistics for that topic.
- When you are finished viewing the topic's statistics, click Go Back to return to the main Statistics page.
Reset course statistics
-
On the Table of Contents page, click View Reports from the Related Tools drop-down list.
-
Click Statistics.
- Click Reset Statistics.
- Click Delete.
Export course statistics
You can export statistics to a CSV file for use in a spreadsheet or database.
-
On the Table of Contents page, click View Reports from the Related Tools drop-down list.
-
Click Statistics.
- Click Export Statistics.
- Click the CSV file to begin download.
Audience:
- Instructor [39]
Course content feedback
Feedback shows the ratings and comments users submit about specific course content. Users can submit ratings and comments anonymously or include their user names.
View course content feedback
-
On the Table of Contents page, click View Reports from the Related Tools drop-down list.
-
Click
 Feedback.
- Click the number in the Ratings column beside a topic to view all ratings and comments from individual users who provided feedback for that topic.
-
When you are finished viewing the topic's feedback, click Go Back to return to the main Feedback page.
Reset course feedback
-
On the Table of Contents page, click View Reports from the Related Tools drop-down list.
-
Click Feedback.
- Click Reset Feedback.
- Click Delete.
Export course feedback
-
On the Table of Contents page, click View Reports from the Related Tools drop-down list.
-
Click Feedback.
- Click Export Feedback.
Audience:
- Instructor [39]
Viewing class and user progress in Content
You can also view general information about completion tracking for all users from the Class Progress page, or the details of a user's completion tracking from the User Progress page, both located in the User Progress tool. See User Progress [49] for more information.
If you click Content in the Reports area on the User Progress page, you can track how many visits a user makes to the Content tool, how much time is spent viewing course material, and how many topics were visited. Expand the report details under each module to find a further breakdown of a user's actions. The expanded details show all topics and sub-modules within the module, how many visits the user made for each topic, and how much time was spent in each topic. Clicking on the module or topic's name brings you to that module or topic in the Content tool.
Access a user's progress summary from Content
- In a topic's Completion Summary, hover over a user's profile display or click on the user's profile picture.
-
Click the
 User Progress link in the user's profile badge.
Note The Progress Summary page displays overall user progress results for the current course, not just the topic.
See also
- User Progress [49]
Audience:
- Instructor [39]