Course Administration
Instructor topics
The Course Administration area is a central area for accessing tools related to setting up and managing your course. From the Course Administration area or widget, you can access many tools to help you run your course smoothly.
What are the basics of Course Administration?
- Accessing Course Administration [1]
- Accessing the Course Offering Information page [2]
- Editing course colors [3]
- Setting up course tools [4]
- Renaming a tool in a course offering [5]
- Editing the course locale [6]
How do I manage course components?
What is IMS Common Cartridge?
- IMS Common Cartridge [12]
- Importing Common Cartridge packages [13]
- How are protected Common Cartridge resources handled? [14]
What is Mobile Brand Administration?
Audience:
- Instructor [18]
Course Administration basics
Audience:
- Instructor [18]
Accessing Course Administration
Click ![]() Edit Course on your navbar, or access the course administration tool you want to use directly by selecting its link in the Course Administration widget.
Edit Course on your navbar, or access the course administration tool you want to use directly by selecting its link in the Course Administration widget.
Audience:
- Instructor [18]
Accessing the Course Offering Information page
You can edit the properties of your course offering from the Course Offering Information page.
Access the Course Offering Information page
Do one of the following:
-
Click
 Edit Course on your course navbar, then click
  Course Offering Information.
- In the Course Administration widget on your course homepage, click Course Offering Information.
Audience:
- Instructor [18]
Editing course colors
You can enhance the appearance of your course and help users identify your course more easily by modifying the colors used in the interface. Learning Environment uses three color settings to render the areas within a course.
- Dark Color Used for the title bar, widgets, and pop-ups. White text is shown against this color.
- Light Color No longer used in most areas (it is being phased out). We recommend you use the same color as the Dark Color. White text is shown against this color.
- Soft Color Used for tabs. Black text is shown against this color.
Select a new color
- On the Course Offering Information page, select the drop-down list beside either Dark Color, Light Color, or Soft Color.
-
Select one of the predefined colors from the palette or specify a custom color by doing the following:
- Enter the hex value for the custom color in the HEX field below the palette.
-
Click the
 Preview Hex Color icon.
- Click the custom color chip at the bottom right of the palette.
- Click Save.
Audience:
- Instructor [18]
Setting up course tools
Course tools, such as Quizzes, Content, Discussions, Chat, Grades, etc., are course components that you add to your course offering to share learning content, foster interaction, and evaluate performance. You can turn course tools on and off so that the tools available in your course are specifically tailored to your pedagogy and course materials. You can also rename tools.
Access the Tools page
Do one of the following:
-
Click Edit Course on the navbar, then click
 Tools.
- Click Tools in the Course Administration widget on your course homepage.
Activating and deactivating tools
Before disabling a tool, be aware of the following:
- Release Conditions based on the tool are not enforced as long as the tool remains disabled.
- Competency activities associated with the tool are hidden, but are still associated with any learning objectives to which they are attached. Users cannot complete these learning objectives while the tool is disabled. You should detach or delete any activities associated with a tool before disabling the tool.
- Grade items associated with the tool remain, but you must manually update them in the grade book.
- Quicklinks to the tool’s items persist but a “No Resource Found” message displays when they are followed. You should remove any related Quicklinks when you deactivate a tool. You may not be able to delete others' Quicklinks.
Activate or deactivate a tool
On the Tool Status page, activate a tool by toggling its Status to ![]() On. Toggle its Status to
On. Toggle its Status to ![]() Off to deactivate the tool.
Off to deactivate the tool.
- Some activated tools can only be accessed from the navbar or homepage widgets.
- Deactivating a tool does not delete any items or user data inside the tool; it simply hides the tool from your course offering. If you turn the tool back on, it restores the users' ability to access the tool.
Audience:
- Instructor [18]
Renaming a tool in a course offering
Renaming a tool changes the wording used in the navbar. You may want to rename a tool if your organization or geographic area is more familiar with different terminology.
Rename a tool in a specific org unit
-
Do one of the following:
-
Click Edit Course on the navbar, then click Tools.
- Click Tools in the Course Administration widget on your course homepage.
-
Click
- Enter the new tool name in the Custom Navbar Name field beside the tool that you want to change the name for.
- Press Enter or Tab on your keyboard or click outside the field to save your changes.
Note Changing the Custom Navbar Name for a tool does not replace all uses of the original term throughout the system. It only changes the display name for the tool on the navbar. To replace all references to a specific term, a site administrator needs to update your organization’s language pack using the Manage Languages tool.
Audience:
- Instructor [18]
Editing the course locale
If your organization supports multiple locales, you can change the default locale used for your course offering by selecting a different locale from the Locale drop-down list on the Course Offering Information page.
Normally users can specify their own locale within their preferences. If you want to override their locale preference so that all users see the same locale in your course, select the Force Locale check box. You might use this if you are teaching a language immersion course and want all the cultural formatting and text in the course offering to reflect the language you are teaching.
Audience:
- Instructor [18]
Managing course components
Audience:
- Instructor [18]
Copying course components between org units
The copy components utility lets you copy quizzes, content, grade items, discussion forums, dropbox folders, and nearly every other type of component from another course offering or a course offering’s parent template. Copying components saves you from having to recreate your course’s resources from scratch and can significantly reduce the amount of work required to create or re-offer a course.
You can use the copy components feature to:
- Reuse components created in a previous course offering.
- Add components created by your peers into your own course offering.
- Set up standard components inside a course template and copy them into a new course offering each time a course is re-offered.
To copy components between course offerings, you must be enrolled in both offerings. (If you want to copy components from a peer’s course offering, ask that user to enroll you). You also need to be enrolled in and have access to the parent template to copy components from it into a course offering.
You can also copy components into a course template, and you can create standard components within a template and then copy them into the template’s associated course offerings.
Overwriting and duplicating content
The only components you might overwrite are course files. Course files are overwritten if one of the files being copied has the same name as an existing file. No other components are overwritten.
For example, if you have three checklists in your current course offering, and copy two checklists from another offering, you will now have a total of five checklists in the current offering. This is true even if the components are identical. If you are copying components from the same source multiple times, be careful not to copy the same items more than once or you will create duplicates.
User data and importing course components
User data is not copied. For example, if you copy the discussions component, only the forums and topics are copied, not the posts inside the topics. Similarly, if you copy dropbox folders, user submissions are not be copied; if you copy quizzes, user attempts are not be copied, etc.
Links and associations between components
Tip We recommend that you Copy All Components between courses to ensure you maintain all desired associations, and then delete any undesired material in the new course.
If you are copying linked or associated components, you must copy all of the related components at the same time. For example, if a discussion topic has release conditions based on the results of a quiz, you must copy all three components—discussions, quizzes, and release conditions—at the same time. Similarly, if you have a quiz that is associated with a grade item, be sure to copy both the quiz and the grade item at the same time. As long as the associated components are copied together, links between them are retained.
Note To copy release conditions, you must select the Release Conditions component.
Special considerations when copying course components
| Component | Notes |
|---|---|
| Competencies | Competencies, learning objectives, and associated activities are copied. |
| Content | Does not include Files or Content Display Settings; these must be selected as separate components. Be sure to copy all "Course Files" used in the course as well as the content topics or only the Content topic structure will be copied. |
| Checklists | Due dates for checklist items are not changed when you copy them. |
| Groups and Sections | Auto-enrollments are not run in the new course. You must enroll users yourself. |
| Navigation Bars | Tool Display Names must also be copied if you have modified the names of tools. |
| Release Conditions | The only release conditions that are copied are ones that are attached to and reference other components that are copied at the same time. For instance, if a quiz has a release condition attached that refers to a content topic, it is only copied if both the quiz and the content topic are copied at the same time. Choosing Release Conditions without selecting any other component does nothing. |
Copy components
-
Go to the Import/Export/Copy Components page for the course offering you want to copy components into, by doing one of the following:
-
Click Edit Course on your course navbar, then click
 Import/Export/Copy Components.
-
Click Import/Export/Copy Component in the Admin Tools widget or from the
 Admin Tools menu on the minibar.
-
Click
-
Do one of the following:
- Select a course from the Select Course Offering dialog, then click Add Selected.
- Select Copy Components from Another Org Unit, and then click Search for offering to find a course to copy.
- Select Parent Template of Current Offering to copy components from the course template the current course offering belongs to.
-
Do one of the following:
-
Click Copy All Components to copy all course components.
Tip We recommend that you Copy All Components between courses to ensure you maintain all desired associations, and then delete any undesired material in the new course.
-
Click Select Components to specify which components you want to copy, then click Continue. Click the Modify link to make changes, or click Finish.
Note To see details for course components, click the Show the current course components link, then click the
 View Detail icon beside a component to see existing items.
-
Click Copy All Components to copy all course components.
- Click Copy Another Package or View Content to see the results of your copy.
See also
Audience:
- Instructor [18]
Course import compatibility
The following table provides a list of learning management systems (LMS) and content providers that you can import course content from. It is recommended that you work with your site administration or Desire2Learn Account Manager when importing content from another LMS.
| Component | IMSCP version | QTI version |
|---|---|---|
| Blackboard 6.0 | 1.1.2 | 1.2.1 |
| Blackboard 6.1.5 | 1.1.3 | 1.2.1 |
| Blackboard 6.2 | 1.1.3 | 1.2.1 |
| Blackboard 6.3 | 1.1.3 | 1.2.1 |
| Common Cartridge 1.0 | 1.1.3 | 1.2.1 |
| WebCT CMU 1.x | 1.1.2 | 1.2.1 |
| WebCT CMU 2.0 | 1.1.3 | 1.2.1 |
| Respondus 2.0 | N/A | 1.2.1 |
| Respondus 3.x | N/A | 1.2.1 |
| SCORM 1.2 | 1.1.2 | N/A |
| SCORM 1.3 (2004) | 1.1.3 | N/A |
| Angel 6.1 | 1.1.2 | N/A |
| UCompass 1.0 | Does not follow IMSCP standard. | Does not follow a QTI specification. |
| Desire2Learn 8.x | 1.1.3 | 1.2.1 |
You can convert packages into importable Desire2Learn-formatted packages using separate conversion tools. Work with your Desire2Learn Account Manager to discuss converting and importing from the following systems:
- Blackboard CE 6 (WebCT CE 6)
- Blackboard CE 8 (WebCT CE 8)
- Blackboard Vista 4 (Blackboard Vista 4)
- Blackboard Vista 8 (Blackboard Vista 8)
- Angel 7.4
See also
Audience:
- Instructor [18]
Importing course components from a file
You can import components created in other learning managements systems, provided by content vendors, or created in a content creation program (like Respondus). To import components, you must have a file containing the components in a format supported by the Import tool.
For assistance creating an export file from another software package, see the user documentation provided with that software, or contact your site administration if you need further assistance.
Tip You can also import components from the Learning Object Repository (LOR).
Import components
-
Go to the Import/Export/Copy Components page for your course offering. To access this page, do one of the following:
-
Click Edit Course on your course navbar, then click Import/Export/Copy Components.
-
Click Import/Export/Copy Components in the Admin Tools widget or from the Admin Tools menu on the minibar.
-
Click
- On the Import/Export/Copy Components page, select Import Components and from a File.
- Click Browse and then locate and select the import file. This is the file created when you exported the content from another software package or another Desire2Learn course, or the file provided by a content vendor.
- Click Start.
- The Preprocessing screen appears showing the progress as the system downloads and opens the file. A green check mark appears next to each stage as it is completed. Depending on the size of the selected file, the preprocessing phase might take some time to complete.
- When both stages are complete, click Continue.
-
In the Import Options section, specify the import settings you want to use:
- If you want to import files into a sub-directory under your course offering’s root directory, enter the sub-directory path in the Import file to field. If you leave this field blank, imported files are saved in the root directory.
- Specify what should happen if a file in the import package has the same name as a file that already exists in the destination directory. If you select Overwrite the existing file, the file that already exists is replaced with the file in the import package. If you select Do not overwrite the existing file, the new file with the same name will not be imported.
- To import metadata, select the Import metadata check box. Metadata is information someone has entered about the components in the file. Selecting this option does not necessarily mean that metadata is imported—the import package might not contain any metadata. This setting simply tells the import process what to do if metadata is encountered.
- In the Select Components to Import section, all of the components found in the import file are listed. Select the components you want to import using the check boxes beside each component.
- To import only certain items from a component, choose Select individual items to import. This will allow you to select individual quizzes, content topics, dropbox folders, etc.
- Click Continue.
-
If you chose Select individual items to import for any component in the previous step, the Select Items page appears. (Otherwise, the Confirm Import Selections page appears.) This page lists all of the items and any sub-items contained in the current component. For example, on the Select Content Items page, all of the modules, sub-modules, and topics are listed.
- To view sub-items, click the + Expand icon next to an item or click Expand All at the top of the list.
- Select the individual items and sub-items you want to import and click Next.
-
Note Not all components have sub-items.
- Repeat for each component you want to import individual items from.
- When you have finished selecting individual items from components, the Confirm Import Selections page appears. You can change the items selected within a component by clicking Modify. You can also review and modify the import options.
-
Click Continue to begin the import.
- The Importing Course Material page appears, showing the import progress.
- When a component has been successfully imported, a green check mark appears beside it. If any component fails to import properly, a red X appears beside it.
- When the process is finished, click Finish to see a final import summary screen with a list of any notes or warnings. For example, if you import a content topic that is not associated with a module, a module is created for it and this action is listed on the final summary screen.
Note If course components with the same name as the course components you are importing already exist in the course, you will end up with multiple course components with the same name. Likewise, if you import multiple files that contain course components with the same name, you will have duplicates. For example, if your course contains a discussion topic called "Exam Review" and you import a course package that contains a discussion topic called "Exam Review," your course will contain two topics called "Exam Review."
See also
Audience:
- Instructor [18]
Exporting course components
You can export components from your course offering to a file. This allows you to reuse these components in another learning management system, including another Desire2Learn Learning Environment, or to store the components and then re-import them into another course offering or template at a later date.
Components are exported to an IMSCP-compliant zip file, a standard file format based on the IMS Content Packaging specification, meaning you should be able to reuse these components in any learning management system that supports this format.
You can export course components from the organization level, except for files in the Organization or Shared files areas.
User Data and exporting course components
User data is not exported. For example, if you export the dropbox folders component, none of submissions to the folders are exported. Similarly, if you export the discussions component, posts inside the discussions topics will not be exported.
Links and associations between components
Associations between components will not be exported. The IMS Content Packaging specification, which the format for export files is based on, does not support these associations (for example, Quicklinks, links to grade items, release conditions, etc.).
Export components
-
Go to the Import/Export/Copy Components page for your course offering. To access this page, do one of the following:
-
Click Edit Course on your course navbar, then click Import/Export/Copy Components.
-
Click Import/Export/Copy Components in the Admin Tools widget or from the Admin Tools menu on the minibar.
-
Click
- Select Export Components. If you want to include any files associated with components, select Include course files in the export package. Click Start.
- Select the components you want to export using the check box beside each component.
- To export only certain items from a component, choose Select individual items to export. This allows you to select, for example, individual quizzes, FAQ sections, dropbox folders, etc.
-
When you are finished selecting components, click Continue.
- If you chose “Select individual items to export” for any component in the previous step, the Select Items page appears.
- This page lists all of the items and any sub-items contained in the current component. (For example, on the Select Dropbox Items page, you will see all of the folders and categories.)
- To view sub-items, click the + icon next to an item or click Expand All.
- Select the individual items and sub-items you want to export and click Continue.
-
Note Not all components have sub-items.
- Repeat the previous step for any other components for which you chose “Select individual items to export.” The Confirm Components to Export page appears. This page lists all the components that are included in the export file along with the number of items selected for each component. You can change the items selected within a component by clicking Modify. This takes you to the Select Items page for that component.
-
Click Continue to begin the export.
- The Export Course Components page is displayed, showing the export progress.
- When a component has been successfully exported, a green check mark appears beside it. If any component fails to export properly, a red X will appear beside it.
-
When the process is finished, click Finish.
- A final Export Summary page is displayed where you can download the export file.
- To download the file, click on the link that says Click here to download the export Zip package. Choose a location to save the file and save it.
Note If you do not download the file from this screen, it is lost. You cannot download it later.
See also
Audience:
- Instructor [18]
Exportable components
The following components can be exported:
- Dropbox
- Calendar
- Checklists
- Competencies
- Content
- Course files
- Discussions
- External links
- FAQ
- Glossary
- Grades (except calculated grade items)
- Navbar templates (not navbars)
- News
- Question library
- Quizzes
- Rubrics
- Self assessments
- Surveys
Audience:
- Instructor [18]
Understanding IMS Common Cartridge
Audience:
- Instructor [18]
IMS Common Cartridge
The IMS Common Cartridge standard allows publishers and content providers to create platform-independent packages of resources (content, assessments, question libraries, discussions, etc.) building on existing IMS content and QTI quizzing packaging standards. Package creators can optionally protect the package, requiring users to authenticate with the creator using web services before importing or accessing protected resources. Common Cartridge was designed to provide a standard way to package and protect content, as opposed to each publisher or each learning management system creating a proprietary method of protection and enforcement.
Note For more detailed information on the Common Cartridge project and its role in the Digital Learning Connection, visit the IMS Global Learning Consortium website (http://imsglobal.org [20]).
Audience:
- Instructor [18]
Importing Common Cartridge packages
You can import Common Cartridge packages and expand your course offerings to include a wide range of innovative, platform-independent, and diverse course content from publishers and content providers.
Importing a Common Cartridge package follows the same process as importing other files of supported import formats. Importing a cartridge automatically creates the applicable content, quizzes, questions, etc. in the Learning Environment and makes them immediately available for use. Package creators have the option of protecting cartridges on import or forcing the user to enter an access code at the beginning of the import process.
Audience:
- Instructor [18]
How are protected Common Cartridge resources handled?
Any protected resource that imports from a Common Cartridge package displays a ![]() Protected icon beside it. When users first try to access a protected resource, they are prompted for an access code, which is distributed by the package creator. Entering the access code and accepting the license agreement initiates the electronic authorization with the package creator’s authorization web service and unlocks the resource for the user.
Protected icon beside it. When users first try to access a protected resource, they are prompted for an access code, which is distributed by the package creator. Entering the access code and accepting the license agreement initiates the electronic authorization with the package creator’s authorization web service and unlocks the resource for the user.
The user will not be prompted to enter their access code when accessing additional protected content from the package until the authorization period ends. The length of the authorization period is determined by the package creator and changes from one package to another. If a course contains protected resources from multiple packages, users will typically be prompted for authorization only once per protected package.
Note Protected resources can be copied between courses, but cannot be exported from Learning Environment.
Audience:
- Instructor [18]
Understanding Mobile Brand Administration
Audience:
- Instructor [18]
Mobile Brand Administration
Use the Mobile Brand Administration page to customize the look and feel of your institution's Mobile Web interface. You can customize the colors and logo in the interface to match your organization's branding or modify the appearance of titles and headings to help users identify courses more easily.
Customizing branding at the organization level establishes the default settings for the org and all org units; child org units do not receive default settings from their parent org units. If you customize any setting at the org unit level, all settings become custom to that org unit. This means that future changes to the organization branding will not transfer or overwrite settings in an org unit with custom branding (unless you restore defaults).
See also
Audience:
- Instructor [18]
Accessing the Mobile Brand Administration page
To access an org unit level branding page, do one of the following:
- In the Course Administration widget on your course homepage, click Mobile Brand Administration.
-
Click Edit Course on your navbar, and then click Mobile Brand Administration.
Audience:
- Instructor [18]
Mobile branding reference sheet
Depending on whether you access the Mobile Brand Administration page from the organization or org unit level, you may not have access to all settings.
General
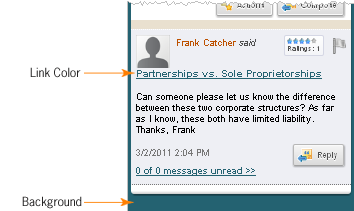
- Background Sets the color that appears behind main content interface elements.
- Link Color Sets the color of system links.
Navbar
Note The Mobile Web navbar does not reproduce settings from the Navbar tool.
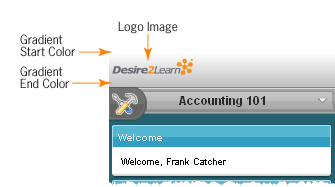
- Logo Image Sets the image that appears at the top of every screen on the navbar. Use this option to tailor your Mobile Web navbar to match your institution's logo or crest. The dimensions of your image should be no larger than 200 x 50 pixels to fit correctly on mobile screens.
- Fill Type Sets the type of background for the navbar area. You can choose between a solid or gradient background. Once you select the fill type, corresponding color options appear.
Page Title
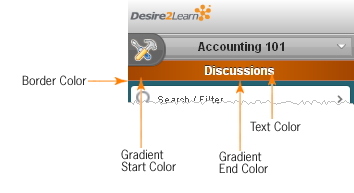
- Fill Type Sets the type of background for the page title bar. You can choose between a solid or gradient background. Once you select the fill type, corresponding color options appear.
- Border Color Sets the color of a thin border on the bottom of the page title area.
- Text Color Sets the color of the page title text.
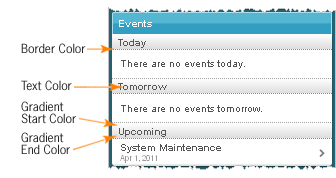
Headings
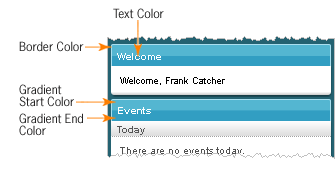
- Fill Type Sets the type of background for the heading bar. You can choose between a solid or gradient background. Once you select the fill type, corresponding color options appear.
- Border Color Sets the color of a thin border on the top and sides of the heading area.
- Text Color Sets the color of the heading text.
Subheadings
- Fill Type Sets the type of background for the subheading bar. You can choose between a solid or gradient background. Once you select the fill type, corresponding color options appear.
- Border Color Sets the color of a thin dotted border on the bottom of the subheading area.
- Text Color Sets the color of the subheading text.
See also
Audience:
- Instructor [18]